Download and place on a server
Elgg is a free open source social networking engine. The engine will enable anyone to set up an online social environment. The basic engine includes everything required to begin a social network immediately.
Elgg offers blogging, micro-blogging, file sharing, networking, groups. Features can also be extended with plugins available for download such as chat. Modifications are possible for people with a decent command of PHP and HTML.
In this tutorial, Elgg will be installed on a Linux server but the steps can be followed for other servers.
- Tools are required:
- Unzip to decompress the downloaded file.
- Text editor for creating and modifying configuration files.
- MySQL Database server.
- Web server.
- PHP.
- FTP, SSH or File Manager to upload and modify permissions for files.
- Knowledge of the files to be served.
Download Elgg
- Point your browser to elgg.org:
- Click the download button to obtain the latest release.
- Save the compressed file.
- Decompress the file by using unzip if appropriate.
- Move the created folder to your server location.
Create MySQL Database and User
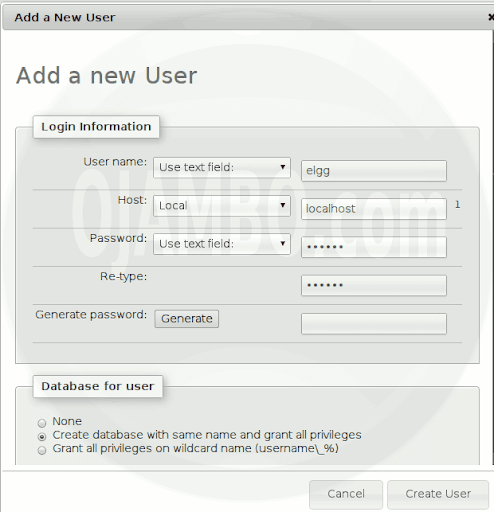
- Point your browser to PhpMyAdmin:
- Click the Privileges Tab.
- Click the Add a new User link.
- Username=”elgg”, Host=”localhost”, Password=”elggpw”.
- Select Create a database with the same name as user under Database for user.
- Click the Create button.

- Command Line Way:
- mysql -u root -p -h localhost.
- Create DATABASE elgg;.
- GRANT ALL ON elgg.* to ‘elgg’@’localhost’ identified by ‘elggpw’.
- exit.

Create Data Folder
- Create Elgg data folder outside of elgg folder:
- Make a folder called elggdata.
- Change the permissions of the folder to allow writing.
- Command Line Way:
- mkdir elggdata.
- chmod -R 777 elggdata.
Install Elgg
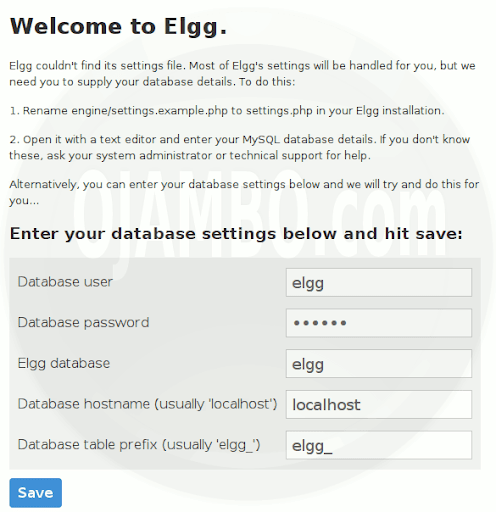
- Point your browser to Elgg on your server:
- Enter the database settings.
- Create an engine.settings.php file based on provided contents.
- Create an .htaccess file based on provided contents.

Setup Elgg
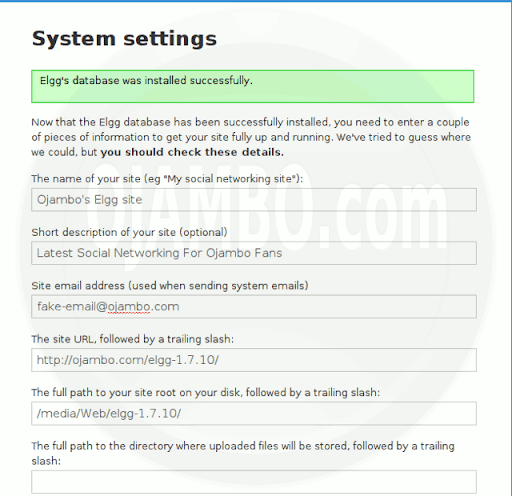
- System Settings:
- Enter the site name such as Ojambo’s Elgg site.
- Input the site email address.
- Enter the full path to the elgg data folder created earlier.
- Click save to continue.

System Setup from the Command Line
###
#        system-setup.sh
#
#        Copyright 2011 Edward <http://ojambo.com/contact>
#
###
## DATABASE INFORMATION ##
mysql -u root -p -h localhost
Create DATABASE elgg;
Create USER 'elgg'@'localhost' identified by 'elggpw';
Grant ALL ON elgg.* to 'elgg'@'localhost';
exit

## EXPAND ELGG ##
unzip elgg*.zip

## CREATE ELGG DATA FOLDER ##
mkdir elggdata

## ENTER ELGG FOLDER ##
cd elgg*

## CONFIGURATION FILES ##
cp engine/settings.example.php engine/settings.php
cp htaccess_dist .htaccess

## PERMISSIONS ##
chmod -R 777 elggdata
Enter Adminstrator Account Setup
- Register Initial User:
- Display name = “Administrator”.
- Email address = “Sales AT Ojambo.com”.
- Username = “Admin”.
- Password = “ElggAdmin”.
- Click Register button

Elgg is now installed, you can enter admin menu after login on the front page.

- Recommendations:
- Use the Command Line, it is faster and helps with troubleshooting.
- Do not use weak passwords for the Database User and Administrator.
- Test the social network before going live.
6 thoughts on “Install Elgg Social Networking”
Comments are closed.